Review: ThinkPad T14 With Windows 10 v. 20H2

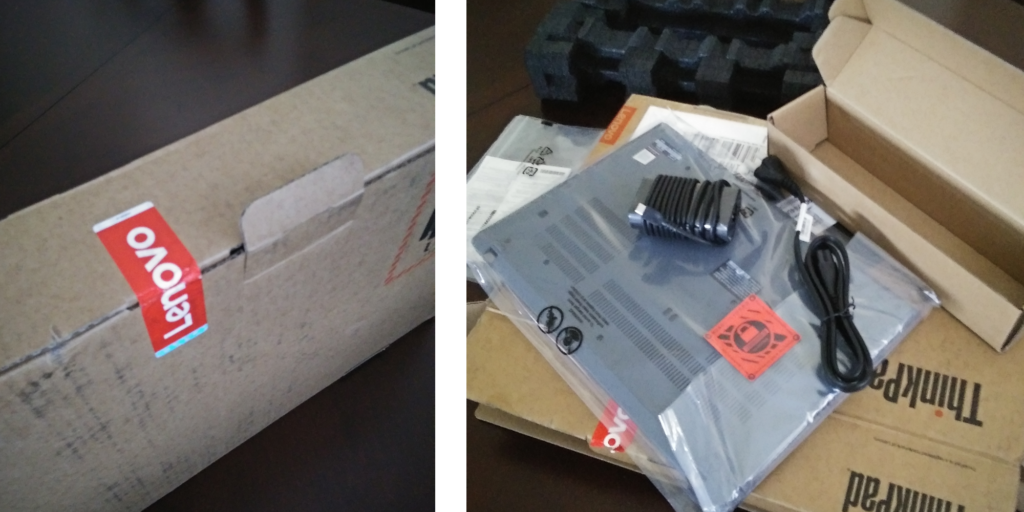
A ThinkPad T14 Gen2 arrived at my home a week ago. As a member of Lenovo Advocates, every so often I receive units to review.

ThinkPads are always a favorite with business professionals because of their sleek design, power, mobility, and durability, as well as many features including a Kensington lock slot.

This year for the T14 Gen 2 there are some special features including:

  • Choice between Black and Storm Grey Aluminum
  • New 11th Gen Intel CPUs with Iris Xe Graphics
  • Nvidia MX450 dGPU
  • WWAN options CAT16 or CAT12
  • Dolby Vision UHD panels
  • Smoother touchpad surface

ThinkPad T14 Gen 2 14 inch laptops are tested against 12 military-grade requirements and more than 200 quality checks to ensure that they run in extreme conditions. From the Arctic wilderness to desert dust storms, from zero-gravity to spills and drops.

Options are available at order, but the following were included in the ThinkPad that I received for review:

Color

Storm Gray (aluminum top) which is a dark gray graphite color

Dimensions

(W X D X H) 329x227x17.9mm/12.9×8.9×0.70in

Operating system:

Windows 10 Pro v. 20H2 (build 19042.867)

Windows Note: When I do reviews I manually clone the system to my most recent daily driver so I can compare performance. I have been a person who preferred to operate Windows with a local account so I could handle updates, etc. manually. However this time, as I was short on time between meetings and Easter Week, I opted to allow Windows to use the cloud to enable a few features available with a log-in to my Microsoft account. To be honest, I was very impressed. Apps, including my printer, installed smoothly. As soon as I turned the printer on, there it was on the new T14. I was prepared as usual with all my backups and removeable media for installations, but I did not need any of it except for my graphics application and one security app. Even with that, once I installed the initial setups via online or DVD, all my tools, settings and personal resources were there – as if by magic. I am now convinced that the cloud is the way to go when setting up a new computer.

Drive:

1022.87 Gigabytes Usable HD Capacity

954.50 Gigabyte HD Free Space

Processor

11th Generation Intel Core i7 vPro Processor

Memory Modules

32472 Megabytes Usable Installed Memory

2 Slots of 16384 MB

Storage

1 TB PCIe SSD

Display

14” FHD IPS PrivacyGuard On-Cell Touch (500nit)

Quite a bit of my hours are spent creating designs for a watch face business. My graphics application performed well by displaying clear colors. There was no lag as I worked on multi-layered multiple images at the same time.

Keyboard

This T14 includes the Lenovo’s classic spill resistant ThinkPad design with trackpad and red TrackPoint as well as a LED backlit keyboard with UC functions for F9–F11. Key travel is smooth and quiet.

Camera

HD IR hybrid camera with webcam privacy shutter2

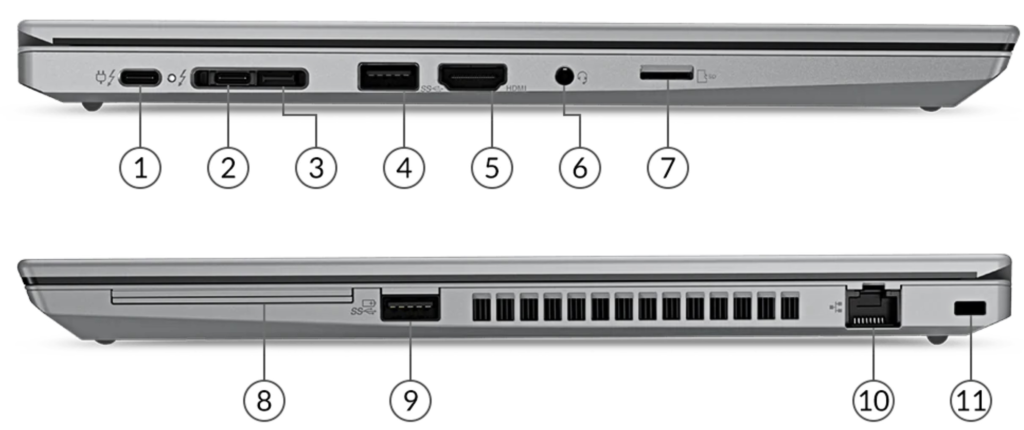
Ports and Slots

  1. USB-C Thunderbolt™ 4 (power delivery)
  2. USB-C Thunderbolt™ 4
  3. Side docking connector
  4. USB-A 3.2 Gen 1
  5. HDMI 2.0
  6. Headphone / mic combo
  7. MicroSD card reader
  8. Optional Smart card reader
  9. USB-A 3.2 Gen 1 (always on)
  10. RJ45
  11. Kensington lock slot

Docking Option

Existing mechanical side docking stations are sold separately: Thunderbolt™ dock /USB 3.0 cable dock/ USB-C cable dock/ Side mechanical dock

After updating firmware on my two-year-old Pro 40 AH Side Dock, it worked beautifully with the T14 Gen 2 .

Battery

Up to 10.7 hours , 50Whr battery (MM18)

AC Adapter

The T14 uses a Type-C 65W that supports RapidCharge.

When I saw this (refer to photo above) my reaction was how “cute” it is compared with older AC adapters.

Audio/Microphone

Dolby Audio Speaker System

 2x User-facing Microphones

Privacy and Security

Match on Chip Touch Fingerprint Reader

RFID and FIPS Fingerprint Reader2

dTPM 2.0 chip

Web camera privacy shutter

ThinkPad PrivacyGuard with On-Cell Touch2

Kensington™ lock slot

Weight:

When it comes to mobility weight is always a factor. ThinkPad T14 weight starts at 1.47kg/3.23lbs. I did not weigh the unit that I received.

Observations and Conclusion:

So far I am enjoying the T14 Gen 2. When I am not writing reviews and helping on Lenovo Forums I spend my work time doing graphic design for a watch face business. The T14 works well with multiple images open online and offline at the same time. Something that I noted on the newer Lenovo  ThinkPads is that there is a red plastic cord holder on the AC adapter cord. I love this because I never remove it by accident, thinking it is my external mouse cord that I’ve used for design work when it is time to do a firmware or BIOS update.

Speaking of BIOS updates, I was pleased to see that Lenovo Commercial Vantage arrived pre-installed. I have always preferred that version. In fact as soon as soon as I powered on, Vantage alerted me of a BIOS update that I did as soon as I finished setting up Windows.

Something else that I noticed is that in a cold environment the aluminum cover becomes quite cold, unlike my black ThinkPads with different coverings. This happened when the T14 was sittings on a desk near a window.  It might be something to consider if ordering a T14 that will be under an AC vent, next to a window, or will be on a worksite outdoors.

Bugbatter

Member, Lenovo Advocates


Security Features In Microsoft Edge

The new Chromium version Edge Browser keeps the earlier Microsoft Edge name but offers better security for users. The following discusses these features that can be accessed via Settings:

Microsoft SmartScreen

Microsoft Edge relies on Microsoft’s Windows Defender SmartScreen security feature. SmartScreen protects Edge users from phishing attacks by performing a reputation check for the websites that users are trying to visit. SmartScreen lets visitors connect to it, but if it finds anything suspicious, a warning message is shown. In addition, SmartScreen is integrated into Windows 10 shell as well because apps may try to bypass the browser by trying to connect to websites on their own. SmartScreen in Windows 10 Shell makes sure that these websites and apps are screened before users can reach them. Should a user not want to use SmartScreen it can be disabled in Settings.

http://Learn More: What is SmartScreen and how can it help protect me? (microsoft.com)

Tracking Prevention in Microsoft Edge

Many websites use trackers to collect and store data about your browsing behavior. Some trackers gather data about you across multiple sites. The new Microsoft Edge allows the user to detect, block known trackers, and configure which trackers should be blocked.  As shown in the above illustration, there are 3 levels of tracking prevention offered. All of them can block harmful trackers.

Basic – Blocks trackers detected as cryptomining or fingerprinting. Trackers intending to personalize content and ads are enabled.

Balanced – Selected by default and is the recommended setting. As a form of prevention this configuration protects from potentially harmful trackers and trackers from sites that the user has not visited.

Strict – This option blocks the most trackers. However, it can interfere with the opening of some websites, likely causing them to not behave as expected. As an example, you may not be able to log into some sites.

Edge’s Sandboxing

The concept of Sandboxing is one that provides a restricted range that determines which services are limited. Sandboxing helps the user protect the computer from the side-effects of browsing; thus preventing websites from hosting malicious code. In other words, if a website intends to send malicious code, it will go to the sandbox. Closing the sandbox automatically erases the malicious code.

When you start the Windows 10 Sandbox, you will see a new Desktop showing only the Recycle Bin and Edge shortcut. The Start Menu and other icons are visible, but they do not work in the sandboxed mode. When starting Edge from the sandboxed Windows 10 environment for browsing you will have maximum security.  If you are ready to use apps, simply open them in the main Windows 10 instead of sandboxed Windows 10.  However, the benefit of the Sandbox is that, no one can trace your activity on the Internet. Your ISP may obtain a log of your activity, but no one can see the activities performed using Edge Sandbox.

Managing Edge Chromium Extensions

The Chromium version of Edge allows users to add Extensions. For that reason it becomes essential to protect systems when connected to a network. The new Edge browser includes a setting for businesses to enable allowed extensions through Group Policy or added to the Registry as a setting to manage set approved extensions.

 No support for ActiveX controls and BHOs

Finally, Microsoft Edge does not support ActiveX controls and BHOs as Silverlight or the old Java did. If it is necessary to run web apps that use ActiveX controls, x-ua-compatible headers, or legacy document modes, a workaround would be to run them in IE11. IE11 offers additional security, manageability, performance, backward compatibility, and standards support.


Customizing Homepage and Start Page In Chromium Edge

Now that Microsoft has been including Chromium Edge with recent Microsoft Updates, there appear to be posts in various forums from users who are needing information on learning how to deal with settings and new features.

When Edge is open you may want to change the Home Page and/or Start Page. 

Change the Home Page:  Click on the Gear in the upper right. Several options are offered for your layout.


  • Focused – presents a clear-looking page free from clutter. The only content on this page is quick links to access your most visited websites.
  • Inspirational – same as focused but with a daily photo background with information about it.
  • Informational – contains articles, images and other data. The news stories section contains tabs that enable the user to click through in order to read information in various  categories.
  • Custom –  can be customized to your liking.  There are many options including using your own photo instead of relying on one provided by Microsoft.
  • Select your choice.

    Change the Start Page:   Click on the 3 dots in the upper right corner. Scroll down to the Gear icon >Settings

    Click On Startup on the left. 

Open specific page. You can enter a URL here by clicking the “Add a new page” button.

Under that there are 3 dots. Clicking on that will allow you to make changes.

Now you have begun to customize your version of Edge. As you become more familiar with Edge Settings you will find other ways to personalize the browser.

Review: ThinkPad L13 Yoga Gen 2 / Windows 10 v. 20H2 / Edge Chromium


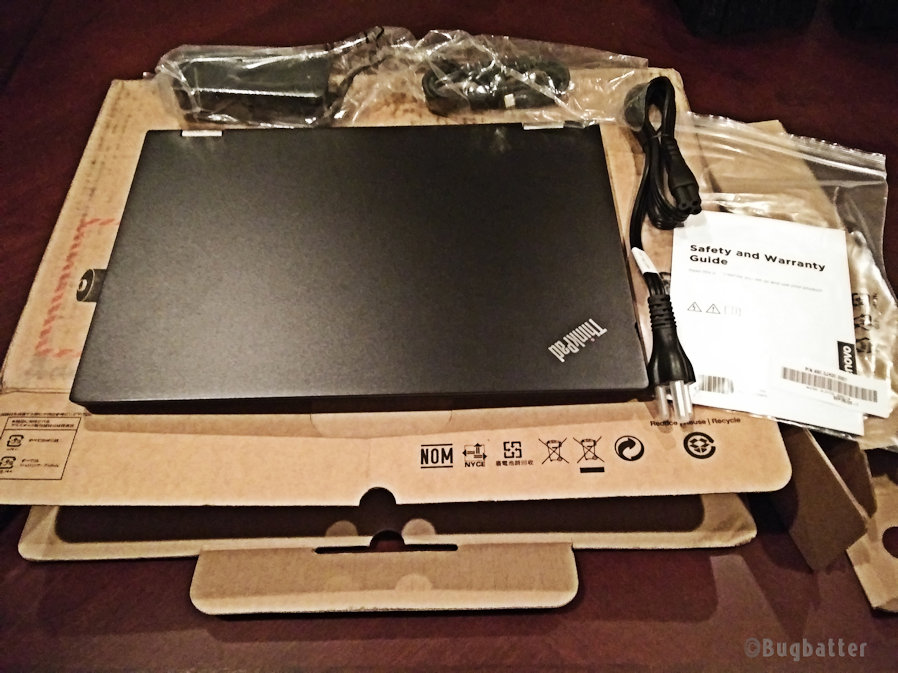
Items included in the box:

65W AC Adapter

4 Cell 46Wh Internal Battery

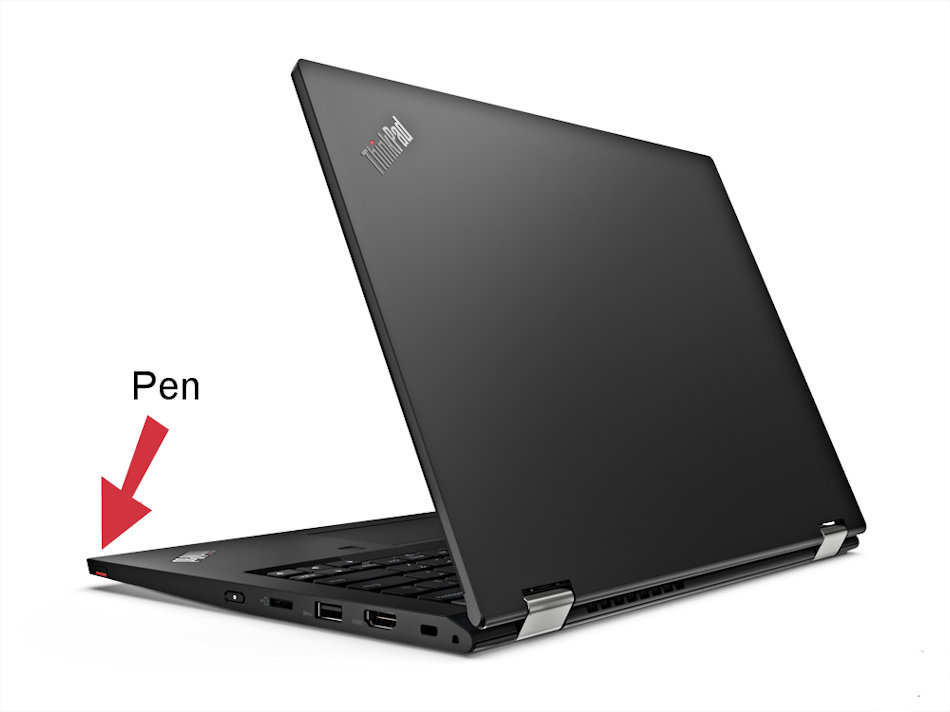
ThinkPad Active Pen (garaged)

Quick Start Guide

Specs

There are several options available for various components at order, but the following were included in the ThinkPad that I received for review:


Operating System

Windows 10 Professional (x64) Version 2004 (build19041.630)


Drive

Western Digital /1TB M.2 PCIe NVMe SSD


Processor

11th Gen  Intel Core i7 Processor @ 2.80GHz / Tiger Lake-U 10nm Technology


Memory

16050 Megabytes Usable Installed


Display

13.3″” screen, Full HD (1920×1080), IPS, 800:1 contrast ratio, 72% gamut(touch)


Keyboard

The L13 uses Lenovo’s classic spill resistant ThinkPad design with trackpad and red TrackPoint. Key travel is smooth.

* The test unit included a backlit keyboard, but that is an option.

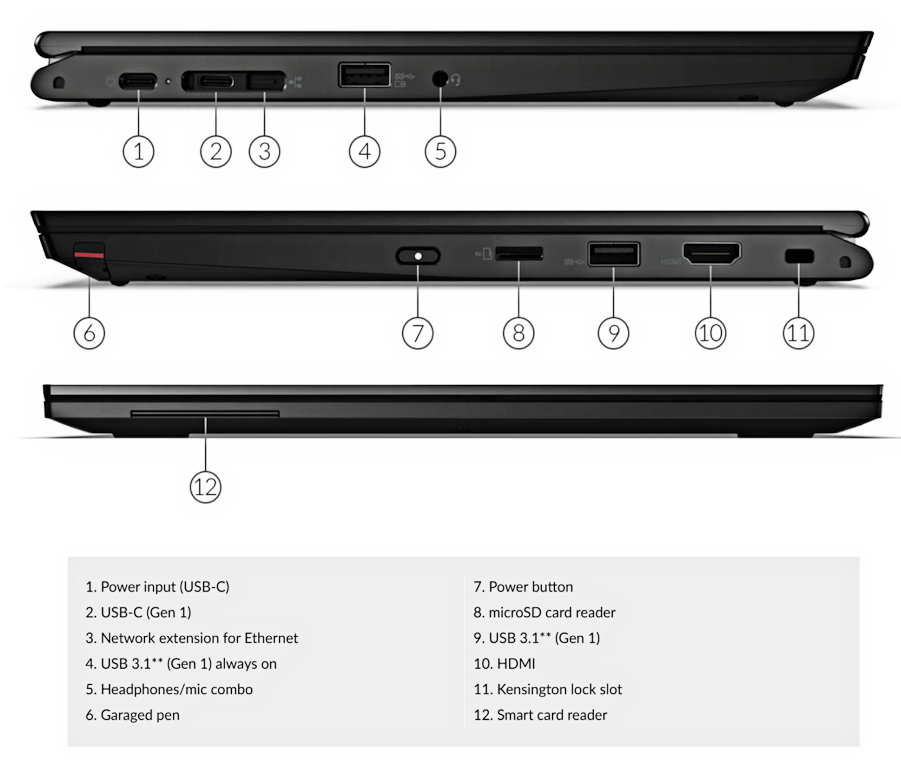
Ports and Slots

2x USB 3.2 Gen 1 (1x Always On)

1x USB-C 3.2 Gen 2 (power delivery and DisplayPort

1x USB 4.0 / Thunderbolt 4 (power delivery and DisplayPort)

HDMI

ethernet extension connector

audio combo jack

microSD card reader

side docking connector

 optional smart card reader

 security keyhole (Kensington lock type)

WLAN and Bluetooth

Intel AX201 11ax, 2×2 + BT5.1


Docking Option

Compatible with Side Mechanical dock and USB 3.0 & USB-C docking solution


Battery

Up to 10.36hrs (46Wh)


Camera

720p with ThinkShutter + World Facing 5.0MP


Audio

Sound Cards:

Realtek High Definition Audio(SST)

Intel Smart Sound Technology for Bluetooth Audio

Playback Device and Speakers:

(Realtek Audio)

Microphone/Recording:

Microphone Array (Realtek Audio)

Realtek Audio dual noise-cancelling microphones offer 360-degree reception for use with conferencing.

Privacy and Security

Fingerprint Reader

SmartCard Reader

Discrete TPM2.0 IR Camera with Windows Hello ThinkShutter camera privacy cover Kensington lock slot

Windows Defender (included in Windows 10)

 Pen:

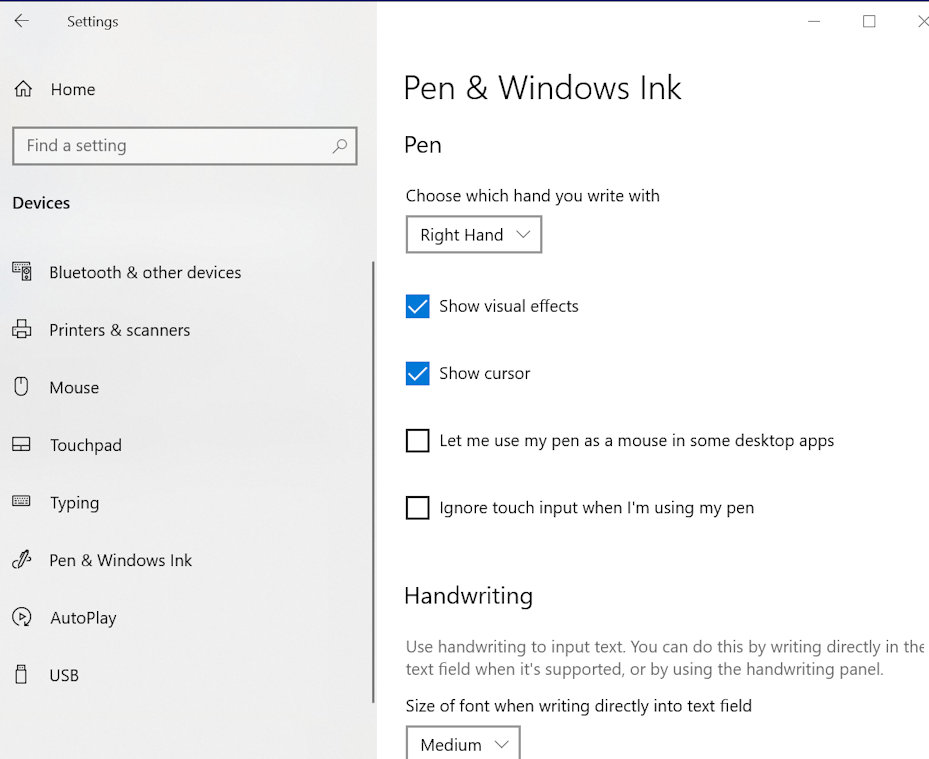
I do not use a tablet/pen often because my work in graphic design involves tiny images created pixel-by-pixel. Therefore, I am probably not the most qualified to comment on Wacom Pen usage. One handy feature is that the housed pen charges right in the ThinkPad L13 Yoga. At the first use, a Lenovo Pen Settings app from Wacom that gives the user access to button and sensitivity settings is installed. There is also a Pen settings page as part Windows 10 Settings as pictured below.


Pre-Installed Software

Lenovo Vantage

Office 365 30-day Trial

No bloat was quite impressive – a real time saver when setting up a new device.

Dimensions

Width: 311.5mm (12.26″”) Depth: 219mm (8.62″”) Height: 17.6mm (0.69″”)

Weight

When it comes to mobility weight is always a factor. I remember when older ThinkPad Yoga models were a bit heavy for women business travelers. That is not the case with this one. The L13 Yoga weighs 1.44kg (3.17lb).


Conclusion

I’ve enjoyed using the ThinkPad L13 Yoga Gen 2. One think that impressed me was the glossy display. I frequently use non-glare, but the colors seem more vibrant and clear on a glossy screen – something I appreciate as I am running graphic design apps all day.  For someone who is traveling for business and taking notes, or in school, the Yoga modes have always been popular. One thing that I had to get used to was having to stabilize the display with one hand while using touch in laptop mode. I’m sure that is because it is a convertible laptop so it is understandable that the hinges have some “play” to them.


Bugbatter


Fix: Thumbnail Previews Are Not Showing In Windows 10/8/7

As a graphic artist in my “other” life, I have been asked what to do when photographers and artists no longer see thumbnail images, but only generic icons. People working with images often prefer to be more organized by viewing small images of what a file contains rather than details or icons.

Enabling and disabling the thumbnail display feature can be accomplished several ways.

The following are the two easiest ways to configure this without having to use the Group Policy Editor or edit the Windows Registry.

  • Use File Explorer Options to enable or disable thumbnail previews.

To Enable:

    1. Open File Explorer and click on the File that you wish to open.
    2. In the File Menu options, click on Change folder and Search options.
    3. When the Folder Options dialog box opens, click the View tab.
    4. Make sure the Always show icons, never thumbnails option appearing under Advanced Settings is UNchecked.

5. Finally, click Ok and Apply the settings.

Conversely, to Disable thumbnails follow these steps:

1. Go the File Explorer and click on the File to open.
2. In the File Menu options, click on Change folder and Search options
3. This will open the Folder Options dialog box. Click the View tab.
4. Under Advanced Settings check the Always show icons, never thumbnails option.
5.Click Ok and Apply settings.

  • Use Control Panel to enable or disable Thumbnails or Icons.

To Enable thumbnails, from the Start Menu or via Search, access the Control Panel.

  1. Click on System and Security and click System.
  2. Select Advance System Settings (on the left-side panel).
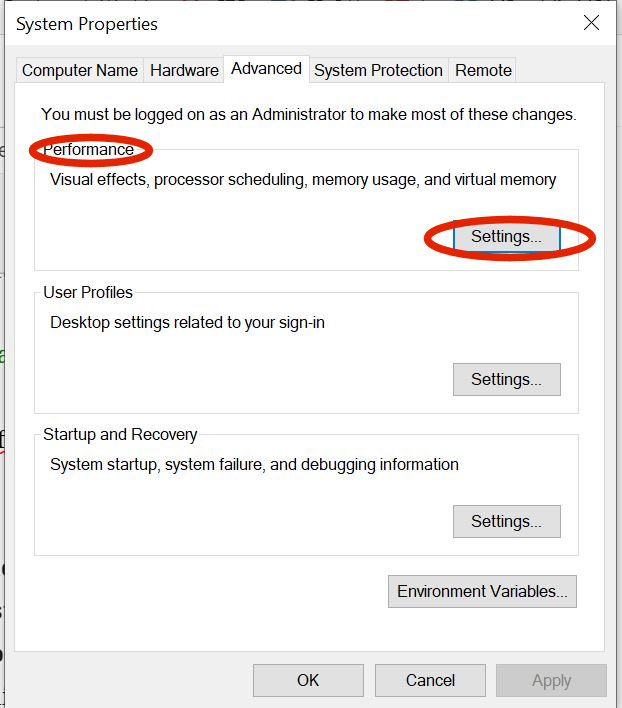
  3. In the System Properties window, click Settings under the Performance heading.
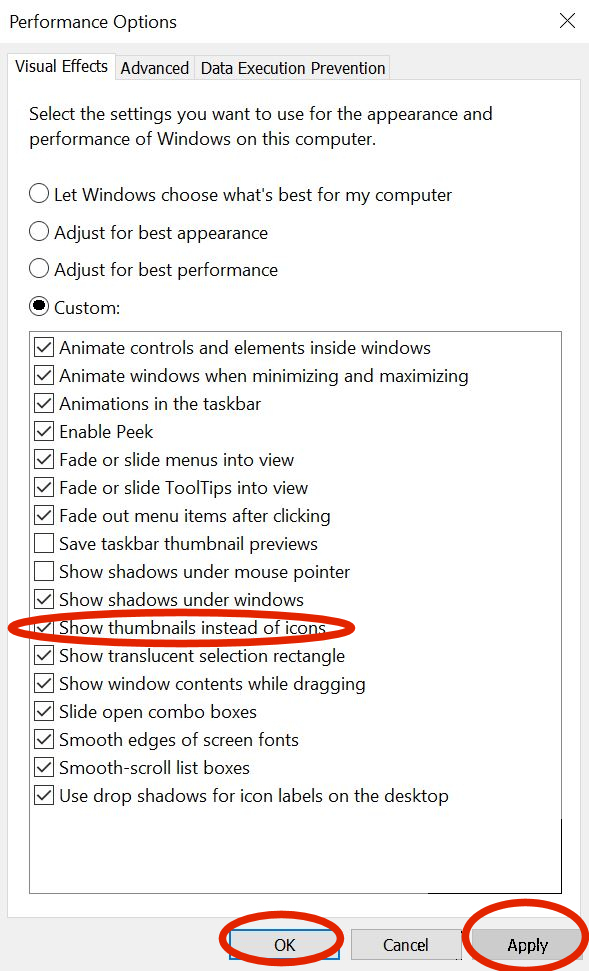
  4. In the Performance Options dialog, click the Visual Effects tab.
  5. Check the Show thumbnails instead of icons under the Custom heading.
  6. Press OK and Apply to save changes.

To Disable thumbnail previews via Control Panel, uncheck the Show thumbnails instead of icons under the Custom heading.

Hopefully, this will have your file viewing options set as you prefer.


Where Is My Windows 10 v.2004 Update?

Some users have had an issue with Microsoft’s not letting them upgrade their Windows 10 operating system to version 2004 despite running Windows 10 versions 1903 and 1909. Certain Windows 10 users who are trying to install the Windows 10 v2004 update have encountered a new setup error: “Your PC settings aren’t supported on this version of Windows 10.”

Originally there was a block in place because of various compatibility issues with numerous systems and hardware configurations. A lack of compatible Windows drivers may also have been responsible for this. Availability was limited to computers running Windows 10, versions 1903 and 1909. 

Some eager users have had success by using the Windows 10 Update Assistant for downloading and installing feature updates. The tool runs requirements check and verifies if your PC meets the prerequisites. In most cases the updates will be downloaded automatically after downloading the Update Assistant. Details:  https://support.microsoft.com/en-us/help/3159635/windows-10-update-assistant

Keep in mind that there is no hurry to install feature updates immediately if you continue to have problems. Some hardware is simply too old. Fortunately, Lenovo is constantly testing devices for compatibility. Watch the list to see if your device is added over time. If your device is not listed in the table [on the page below], your system was not tested by Lenovo and updated drivers may not be available. If you want to proceed with upgrading or updating an untested device, refer to the Microsoft Windows Help website. For your Lenovo computer, don’t forget to check for new drivers using Lenovo Vantage. https://www.lenovo.com/us/en/software/vantage .  Microsoft may provide generic drivers for the hardware as part of Windows 10, but some features and functionality may be lost. https://support.lenovo.com/us/en/solutions/ht510448

August 2020: Now that some time has passed since the launch of Windows 10 v2004, Microsoft has started a new phase in its rollout. Windows 10 users are more likely to download and install the latest version of Windows 10 without any trouble. When your computer is ready for the new Feature Update the update will be available manually by checking Windows Update settings. Once offered, the update can take a couple of hours depending on several variables, so be patient.


How to Change Fonts In Edge

 The new Chromium-based  Microsoft Edge provides settings that enable the user  to change font in order to fit preferred viewing requirements. Edge’s default font size can be customized globally for all websites that do not use a predefined style, as well as for settings. 

Change Only Default Font Size

To change the default font size on Microsoft Edge using predefined settings, follow these steps:

    • Open Microsoft Edge browser.
    • Click the ellipsis (three-dot) button from the top-right.
    • Click Settings on the menu.
    • Click on Appearance.
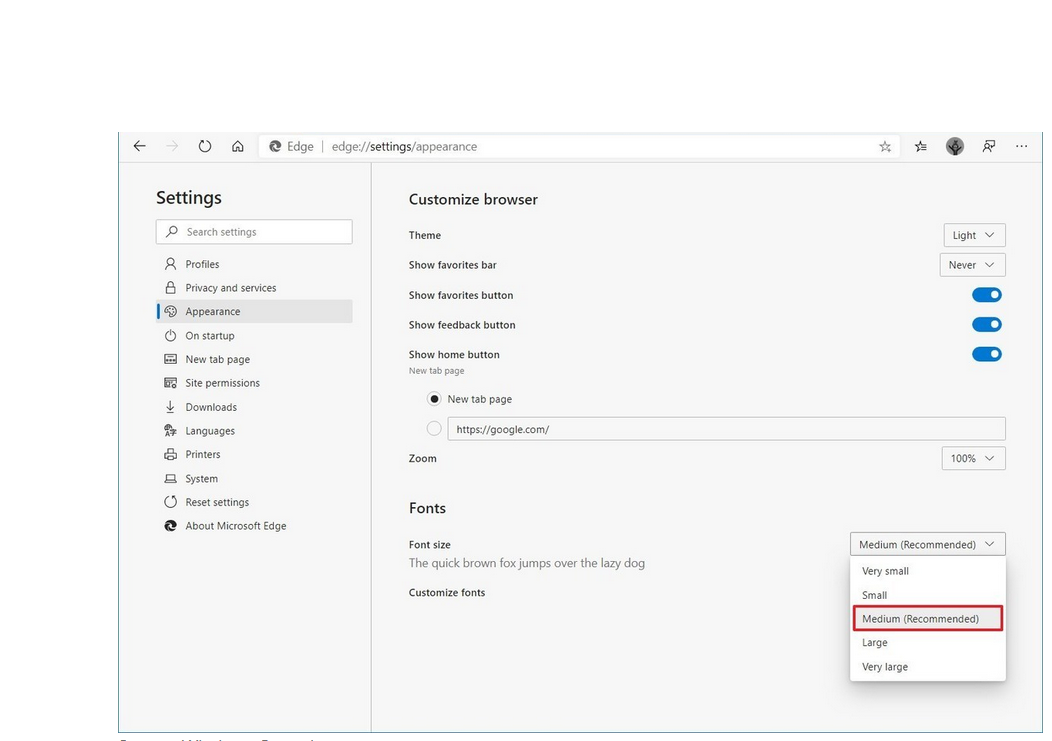
    • Under the “Fonts” section, use the Font size drop-down menu and select a predefined option:
      • Very small
      • Small
      • Medium
      • Large
    •  From now on the new font size will be registered in the settings page as well as for websites.

      ———————————–

      Font Customization in Edge

      To change the default font styles and size so they are more customized, follow these steps:

      • Open Microsoft Edge browser.
      • Click the ellipsis (three-dot) button from the top-right.
      • Click Settings on the menu.
      • Click on Appearance.
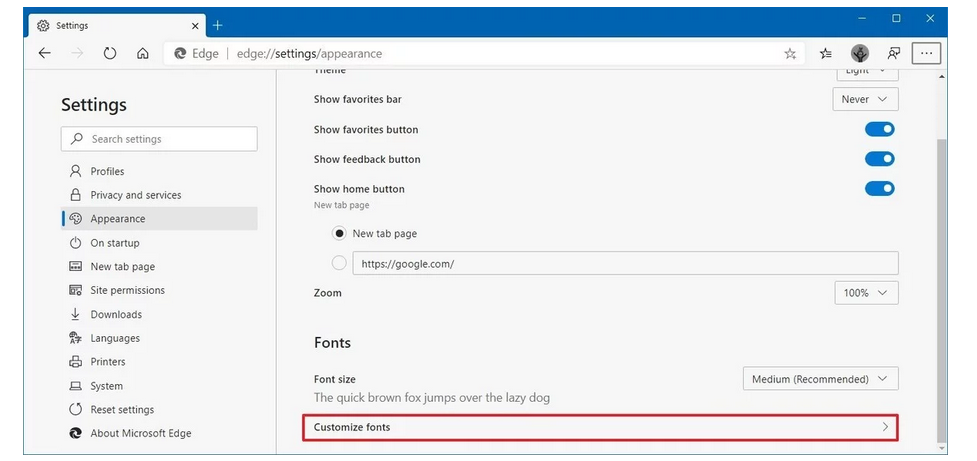
      • Under the “Fonts” section, click the Customize fonts option.
      • Use the Font size slider to adjust the size of the font size.
      • Use the Minimum font size slider to increase or decrease the minimum size.
      • Use the available drop-down menus to choose a different font style for:
        • Standard font
        • Serif font
        • Sans-serif font
        • Fixed-width font

After following these steps, the Microsoft Edge browser will use the specified font size for settings and websites so that the customized font style will appear for any website that does not have a defined font.

If you have not already tried the new Edge, it can be downloaded here: https://support.microsoft.com/en-us/help/4501095/download-the-new-microsoft-edge-based-on-chromium

Microsoft Updates, January 2020

I usually post the monthly updates at Lenovo Community Forums, but they are still in Read-Only mode, so I am posting them here for my followers.

Microsoft Updates

The Microsoft January security updates have been released:
7 are rated Critical
41 are rated Important

For more information about the updates released today, see https://portal.msrc.microsoft.com/en-us/security-guidance/summary.
Use the search box to determine which updates are needed for your system.
Information about the updates for Windows 10 is available at Windows 10 Update history.

MSRT — Microsoft released an updated version of the Microsoft Windows Malicious Software Removal Tool on Windows Update, Microsoft Update, Windows Server Update Services, and the Download Center.

* As of January 14, 2020) Windows 7 and Windows Server 2008 R2 will be out of extended support and no longer getting security updates.

===========================================

Adobe Updates

Adobe released Version 32.0.0.314 of Adobe Flash Player for Windows, macOS, Linux and Chrome OS. Once again, the update contains assorted functional fixes.
NOTE: The embedded ActiveX Flash for Windows 8.1 and Windows 10 remains at version 32.0.0.255.

Microsoft Edge and Internet Explorer 11: Security updates for Adobe Flash Player are automatically updated to the latest version for Windows 8.1 and 10 via Windows Update.
Direct downloads for Windows 7 and earlier [as well as Win 8.1/10 NPAPI & PPAPI ]:
Revised installer links located toward bottom of: https://helpx.adobe.com/flash-player/kb/installation-problems-flash-player-windows.html 

Internet Explorer
https://fpdownload.macromedia.com/pub/flashplayer/latest/help/install_flash_player_ax.exe

NPAPI/Plugin-based browsers (Firefox, PaleMoon .etc) –
https://fpdownload.macromedia.com/pub/flashplayer/latest/help/install_flash_player.exe

PPAPI/Pepper-Chromium based browsers
https://fpdownload.macromedia.com/pub/flashplayer/latest


Restoring Corrupted or Old Versions of Files In Windows 10

Question 

I inadvertently deleted a previous version of file. How can I restore it?

Answer 

Windows has a tool that can help you with this, if it has been enabled prior to your needing restoration. Once File History has been configured to your liking, you can restore previous versions of files by using any of these methods:

1. Launch a File History restore operation by accessing a file’s Properties page and using the controls on the Previous Versions tab. Navigate to the current version of the file. Right-click on the file>Properties

2. Launch the File History tool and navigate to the Restore command at the bottom of the Backup Options page. To do this, in the search box on the task bar, type restore files, and then select Restore your files with File History. Look for the file that you need. Use the arrows to view all of its versions. When you find the version you want, select Restore in order to save it in its original location. To save it in a different place, right-click Restore, select Restore to, and then choose a new location.

3. Launch the restore operation from within File Explorer. Navigate to the directory where the original file resided. Select the file in File Explorer. Click the History button. File History will open the most recent backup copy of the file in a preview mode. You can scroll through all the available versions by using the Previous and Next buttons at the bottom of your screen. Once you locate the version that you want to restore, just click the green Restore button. File History will prompt you for the next step. The default choice is Replace The File In The Destination. However, if you wish to keep both files, there is also an option for that.

You’ll also notice a small cog icon in the upper-right corner of the File History window. Clicking the icon and choosing Restore To will open the Restore To dialog. This will enable you to select another location on your hard disk to restore the file to, so that you can review both files and decide later which to keep.

Reference:  https://support.microsoft.com/en-us/help/4027408/windows-10-backup-and-restore

System Restore Fails After Windows 10 Update

Windows 10 updates may be installed automatically or manually. The updates may install the newest Windows 10 version and/or patch security issues and introduce other features.

Sometimes Windows 10 users who run into issues after updating, attempt to use System Restore to restore the system to an earlier version. Microsoft notes that it may happen that Windows 10 cannot be restored to an earlier version and that users receive the Stop Error (0xc000021a).
Consider the following scenario:
You install Windows 10 on a clean computer.
You turn on system protection, and then create a system restore point that is named “R1.”
You install one or more Windows 10 updates.
After the updates have finished installing, you restore the system to the “R1” restore point. In this scenario, the system is not restored to the “R1” restore point. Instead, the computer experiences a Stop error (0xc000021a). You restart the computer, but the system cannot return to the Windows desktop.
However, in this scenario, the system is not restored to the “R1” restore point. Instead, the computer experiences a Stop error (0xc000021a). You restart the computer, but the system cannot return to the Windows desktop.

Cause
This happens because Windows stages the restoration of files that are in use during a system restore process. The information is saved to the Windows Registry and the restoration completes on the next start of the PC. In this particular situation however, Windows 10 loads the current drivers before restoration. That results in a mismatch and the Stop Error.
—————————–

Fixes
There are two ways to fix this issue:
1.Disable Driver signature enforcement
2.Use the WinRE method to restore the system


1.Disable Driver signature enforcement

* Boot the computer into the Windows Recovery Environment by restarting and holding down the Shift key. The environment should be loaded automatically after several failed restarts.
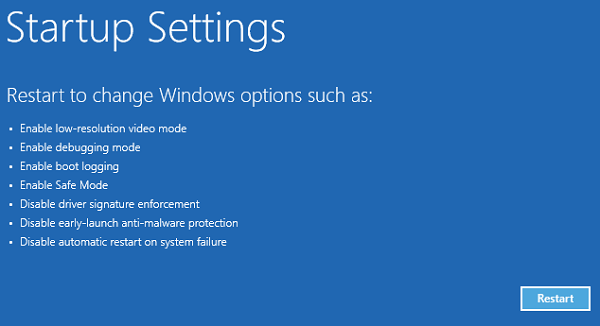
* Select Troubleshoot > Advanced Options > More Recovery Options > Startup Settings > Restart Now.
* The list of startup options is displayed.
* In the list of startup settings, select Disable driver signature enforcement using the arrow keys.
* Follow the instructions. Allow the startup process to continue.
* When the computer reboots, the system restore process should resume and finish. These steps restore the computer to the state that it was in before you started the restore process.

2. Use WinRE

Microsoft also suggests that System Restore can be run using the Windows Recovery Environment and not through the Settings application. To restore Windows to a restore point by using WinRE instead of the Settings dialog box, from the Windows desktop:
* Use Windows-I or select Start > Settings > Update & Security > Recovery.
* Under Advanced options, select Restart now.
* After WinRE starts, select Troubleshoot > Advanced options > System restore.
* Enter your recovery key as it is shown on the screen.
* Follow the instructions in the System Restore Wizard to select a system restore point and restore the system.


Sources:

https://support.microsoft.com/en-us/help/4503117/system-restore-on-windows-10-fails-after-you-install-updates

https://www.thewindowsclub.com/system-restore-not-working-after-windows-10-update